Batteries are an important part of your motorhome.
They provide power to operate the motorhome’s accessories as well as allowing it to drive down the road. Yet, batteries are a common source of frustration when they aren’t performing as they should and can quickly turn your dream trip into a nightmare. Batteries have a tough existence, but knowing how to care for them will ensure that you will get the most out of your batteries in both performance and longevity.
In addition to 120 VAC electrical systems, which are powered by shore power or a generator, your coach has two separate 12 volt battery systems. One system is similar to what your car or truck has. It’s a single battery that is used to start your engine and provide 12 volt power to operate windshield wipers, lights and a few automotive accessories. This battery is recharged by the engine’s alternator. The second system is a multi-battery configuration that powers the coach systems, such as interior lighting, fans, water pumps, slideouts, etc. Smaller motorhomes may have only two batteries while larger diesel pushers may have as many as eight batteries. In addition, batteries may also be used to power an inverter that produces 120 VAC power to run high voltage electrical components when there is no shore power or generator operating.
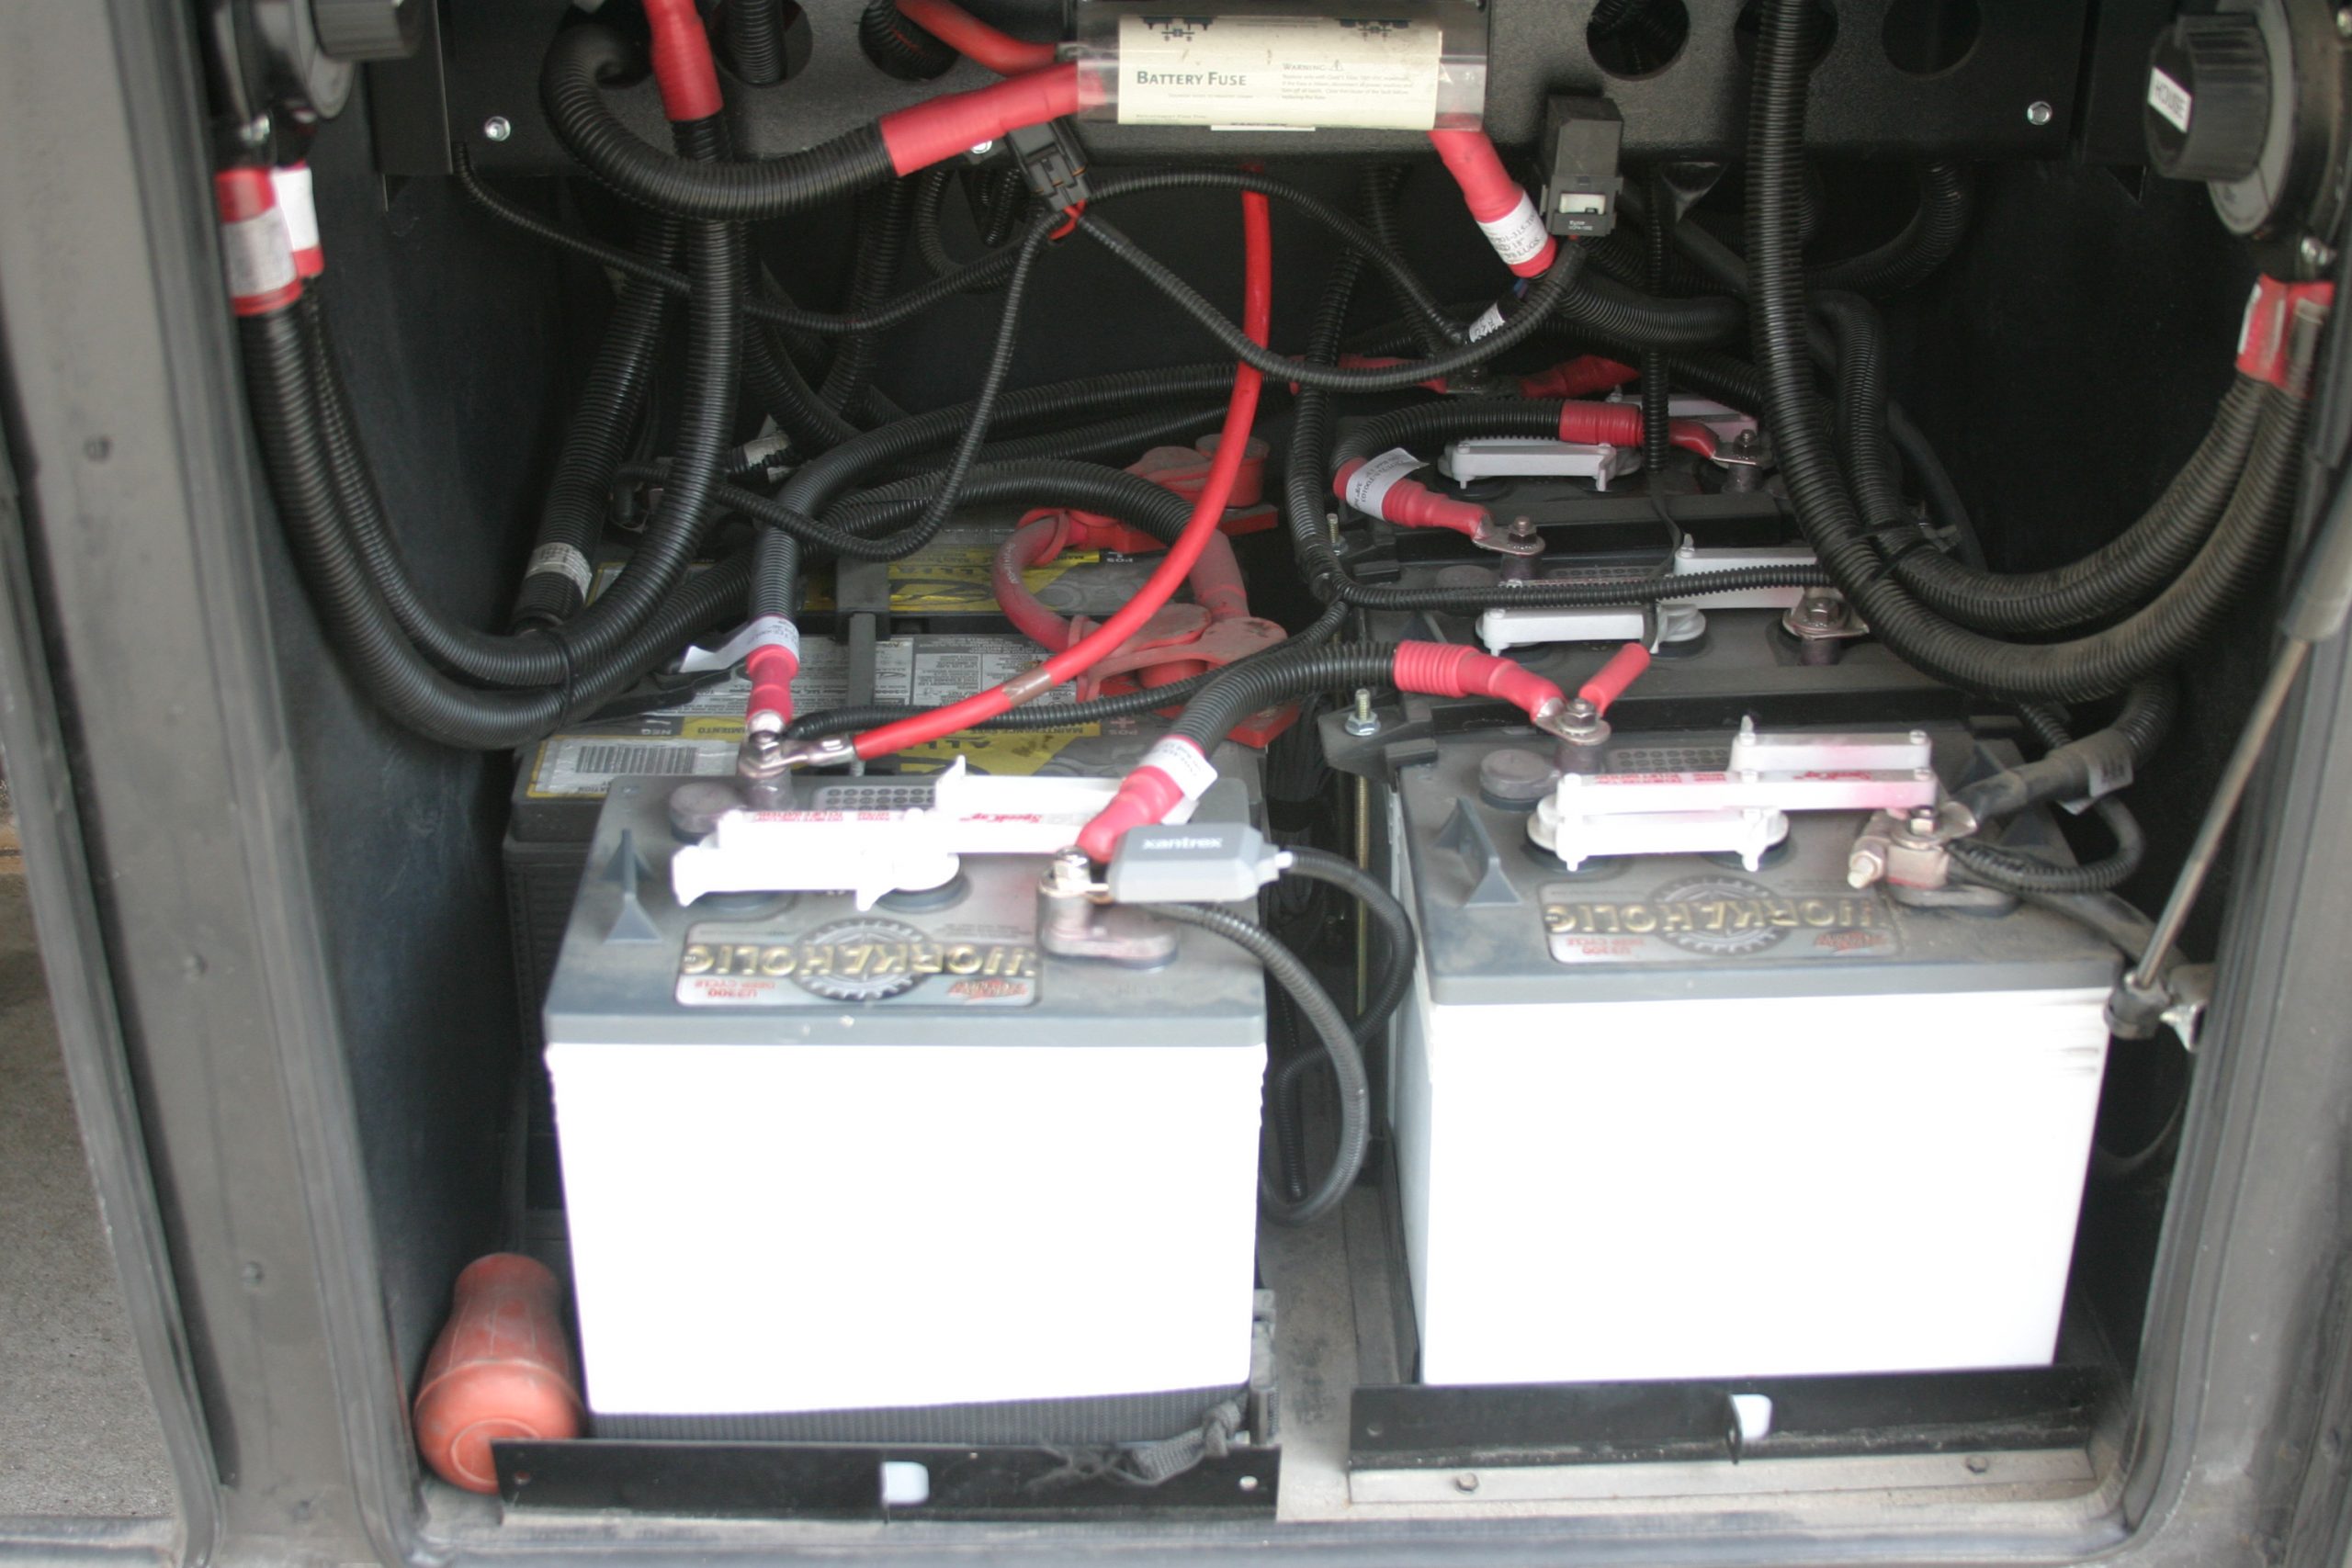
A bank of six 6-volt deep cycle batteries
How do RV batteries work?
Batteries don’t “make” electricity. They store it and make it available on demand. But once the juice is gone, it will need to be refilled, much like your vehicle’s fuel tank. The chassis battery is recharged by the engine’s alternator while driving. The house batteries that power your coach’s accessories can be charged by a converter or inverter/charger when you are plugged into shore power or when operating the generator. They can also be charged from the vehicle’s alternator when driving. Normally, the chassis and coach batteries are two different systems that don’t interface with one other. This is mainly done so that you can’t drain your vehicle’s battery down when camping, for example, leaving you unable to start your engine later on – although there are other reasons why they are kept separate as well. Chassis batteries are designed to deliver a large burst of power for a short time to start the engine, but coach batteries are designed to deliver less power over a much longer time. These are called deep cycle batteries. Fortunately, motorhomes are equipped with a charge solenoid. This solenoid bridges the two battery systems and is activated by the ignition key switch, allowing the engine’s alternator to charge both battery systems when driving.
Batteries operate by way of a chemical reaction. The electrolyte inside the battery, which is basically sulfuric acid, reacts with the lead plates inside the battery to produce power by transferring electrons from the electrolyte to the battery plates. In the process of giving up these electrons, the electrolyte undergoes a chemical process that transfers sulfur to the battery plates and turns the electrolyte into water. When you recharge the battery, the sulfur recombines with the electrolyte, changing it from its water state back to acid again.
How long do RV batteries last?
Typical automotive batteries are rated at 3-years, 5-years or more. That’s based on average use, but it’s not particularly indicative of how long batteries really last. This is especially true in an RV application where usage varies considerably more than that of your daily driver. Batteries are actually rated in charge cycles. You can fully discharge a battery and then recharge it. That is considered as one full cycle. Most batteries are going to have an expected lifetime of between 50 and 80 cycles until they will no longer be capable of performing. But these cycles increase exponentially if you don’t discharge them all the way. If you only discharge the battery one-tenth, you won’t get 10 times the life but it will be more like hundreds – so the secret to getting the most out of your battery is to not allow it to discharge any further than necessary before recharging the battery.
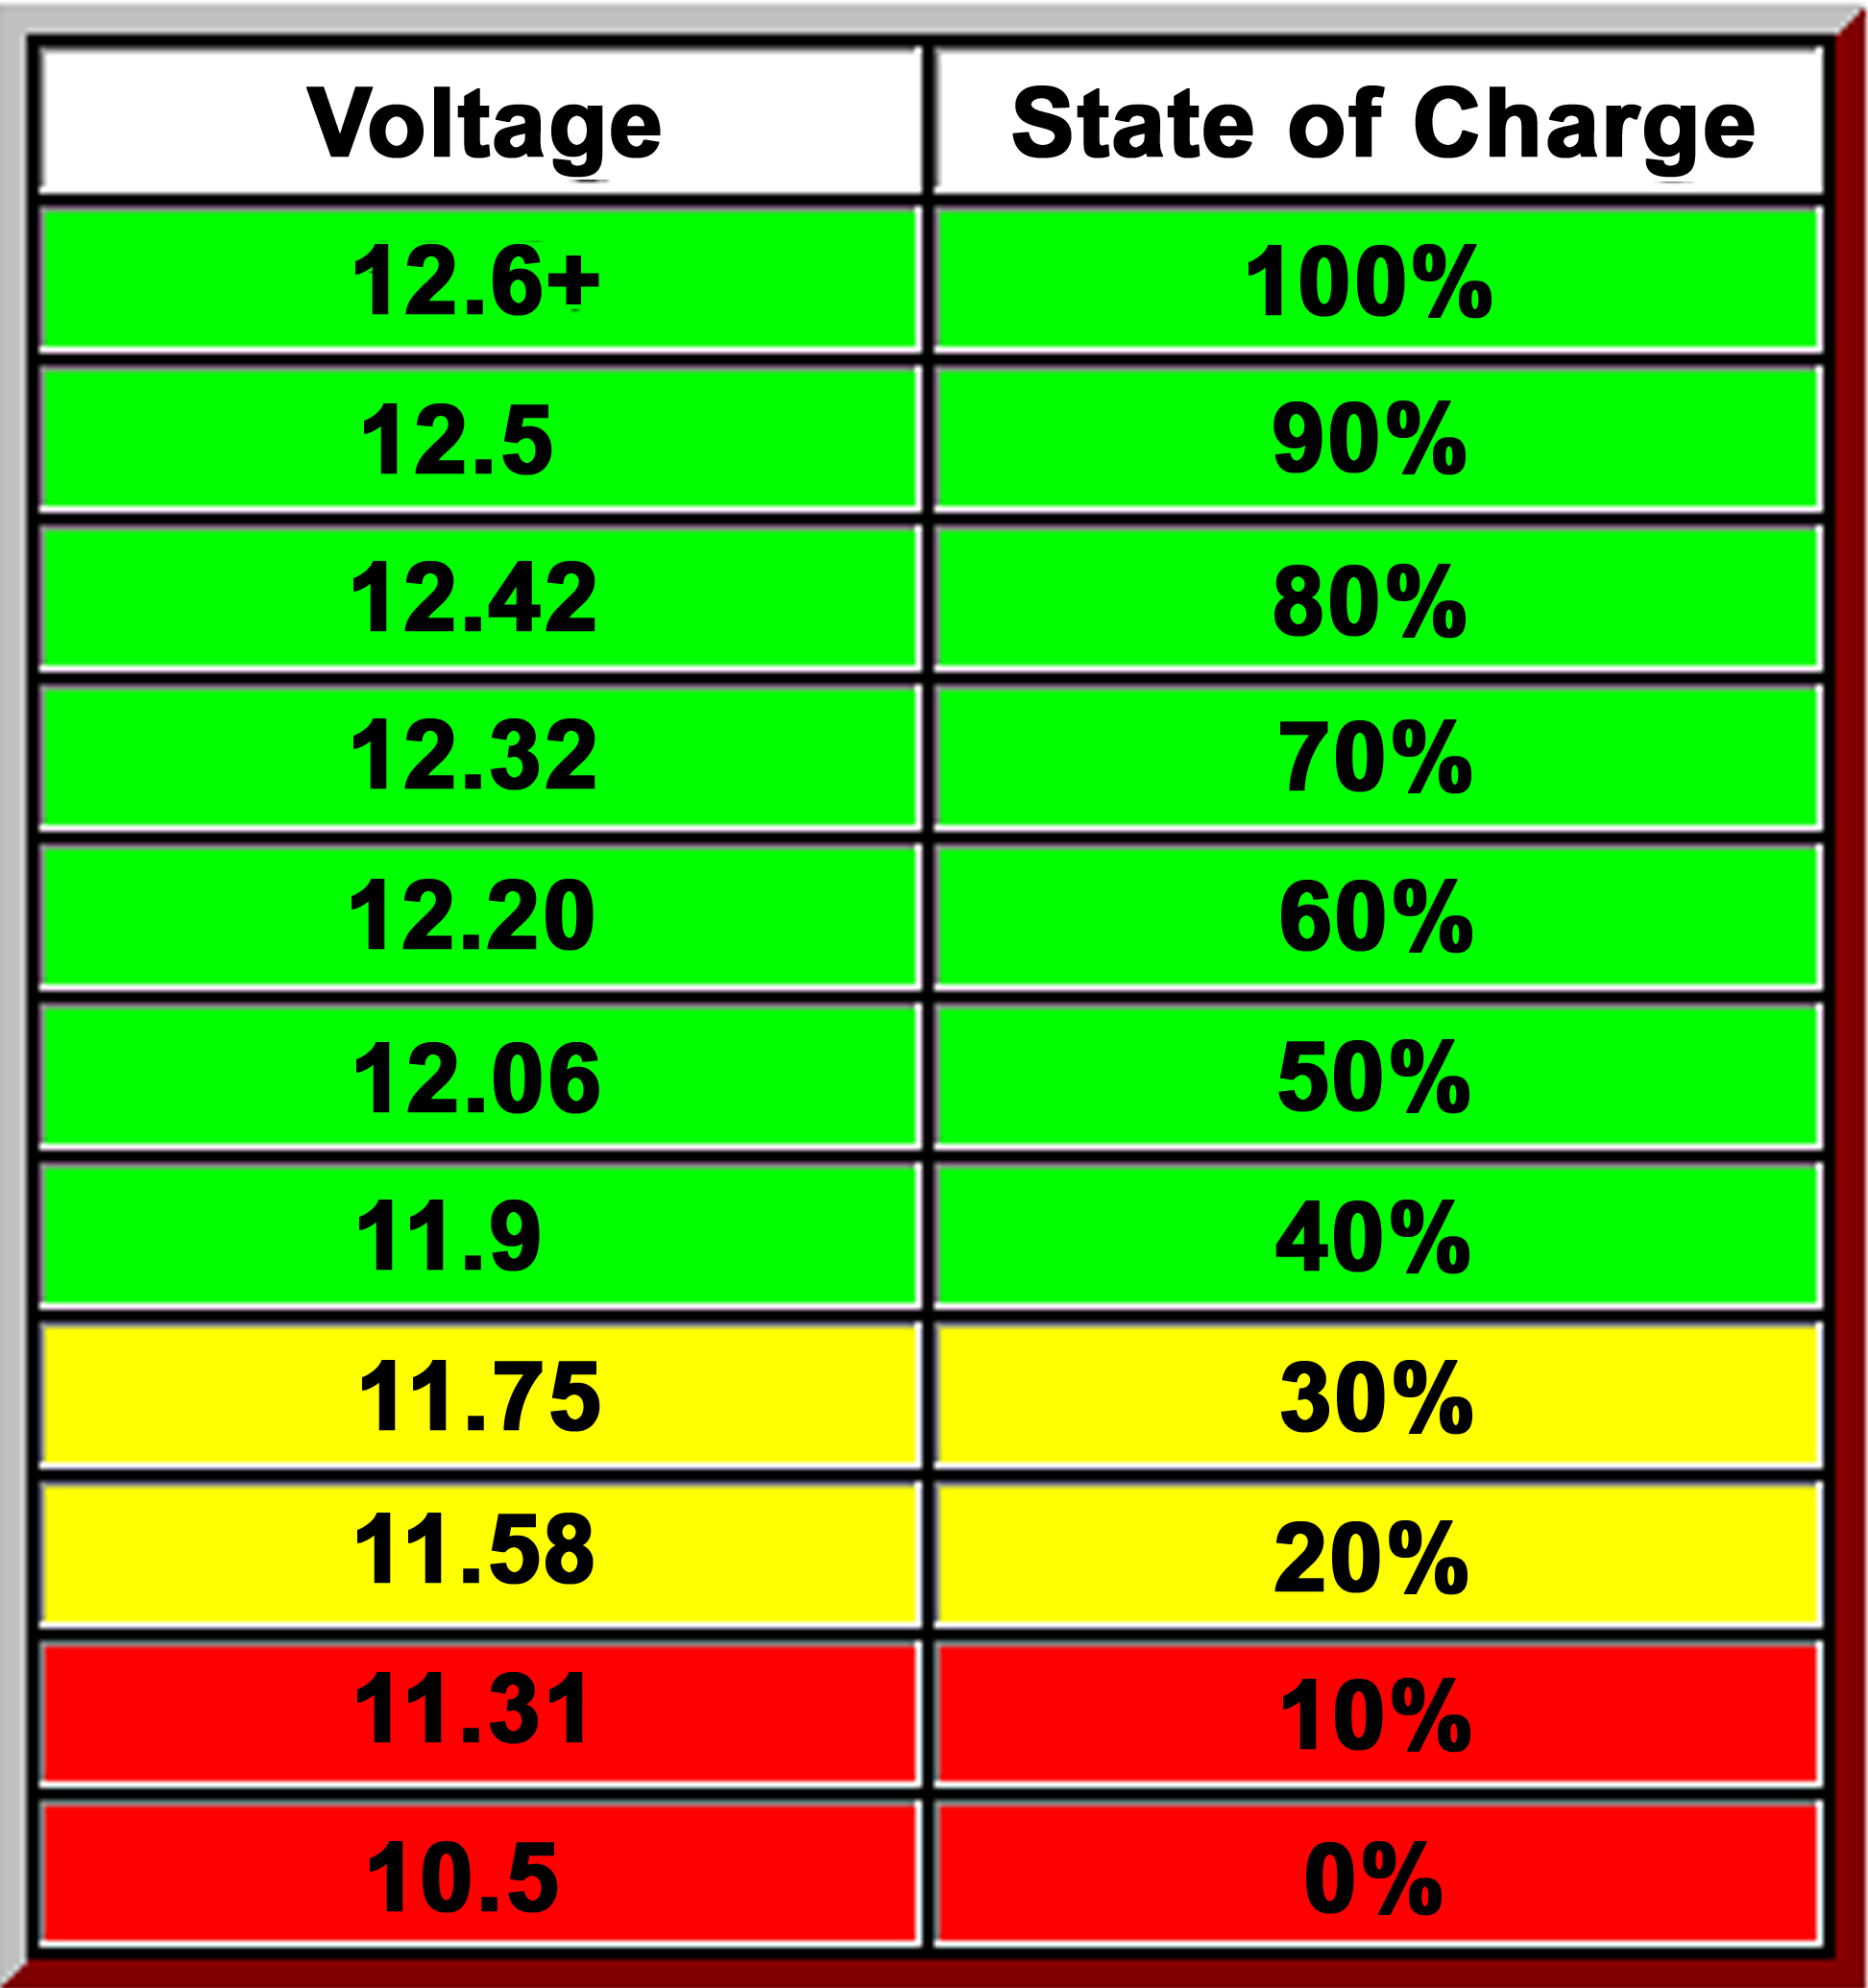
The voltage versus state of charge graph
For this reason, it’s best practice to never discharge a battery below 40% of its charge level. If you exceed that, the voltage will be much lower and won’t provide adequate power to run your devices. Plus, you will put undue stress on the battery, thereby shortening its life. To determine exactly what the charge status of your battery is, refer to the voltage drop chart above. These voltages are what you will read when the batteries are connected in your motorhome but are not currently being charged. A battery being charged will show a higher voltage reading.
If you find that you are constantly drawing your battery voltage down into the danger zone, you may have an undersized battery bank. Battery banks are just like fuel tanks. If you want to drive farther, you need a bigger fuel tank. Most motorhomes will have multiple batteries and coaches with more electrical needs generally have room for, or are built with, more batteries. Increasing your battery bank size or improving it with higher capacity batteries may give you the extra runtime you need for your coach.
12- versus 6-volt batteries
While coach systems are 12 volt, many motorhomes utilize 6 volt batteries. These batteries are the common 6 volt deep cycle batteries used in golf carts. They generally have a heavier plate construction, are widely available, are more robust and capable of greater output than 12 volt deep cycle batteries. These battery banks need to be wired so that they deliver a 12 volt output.
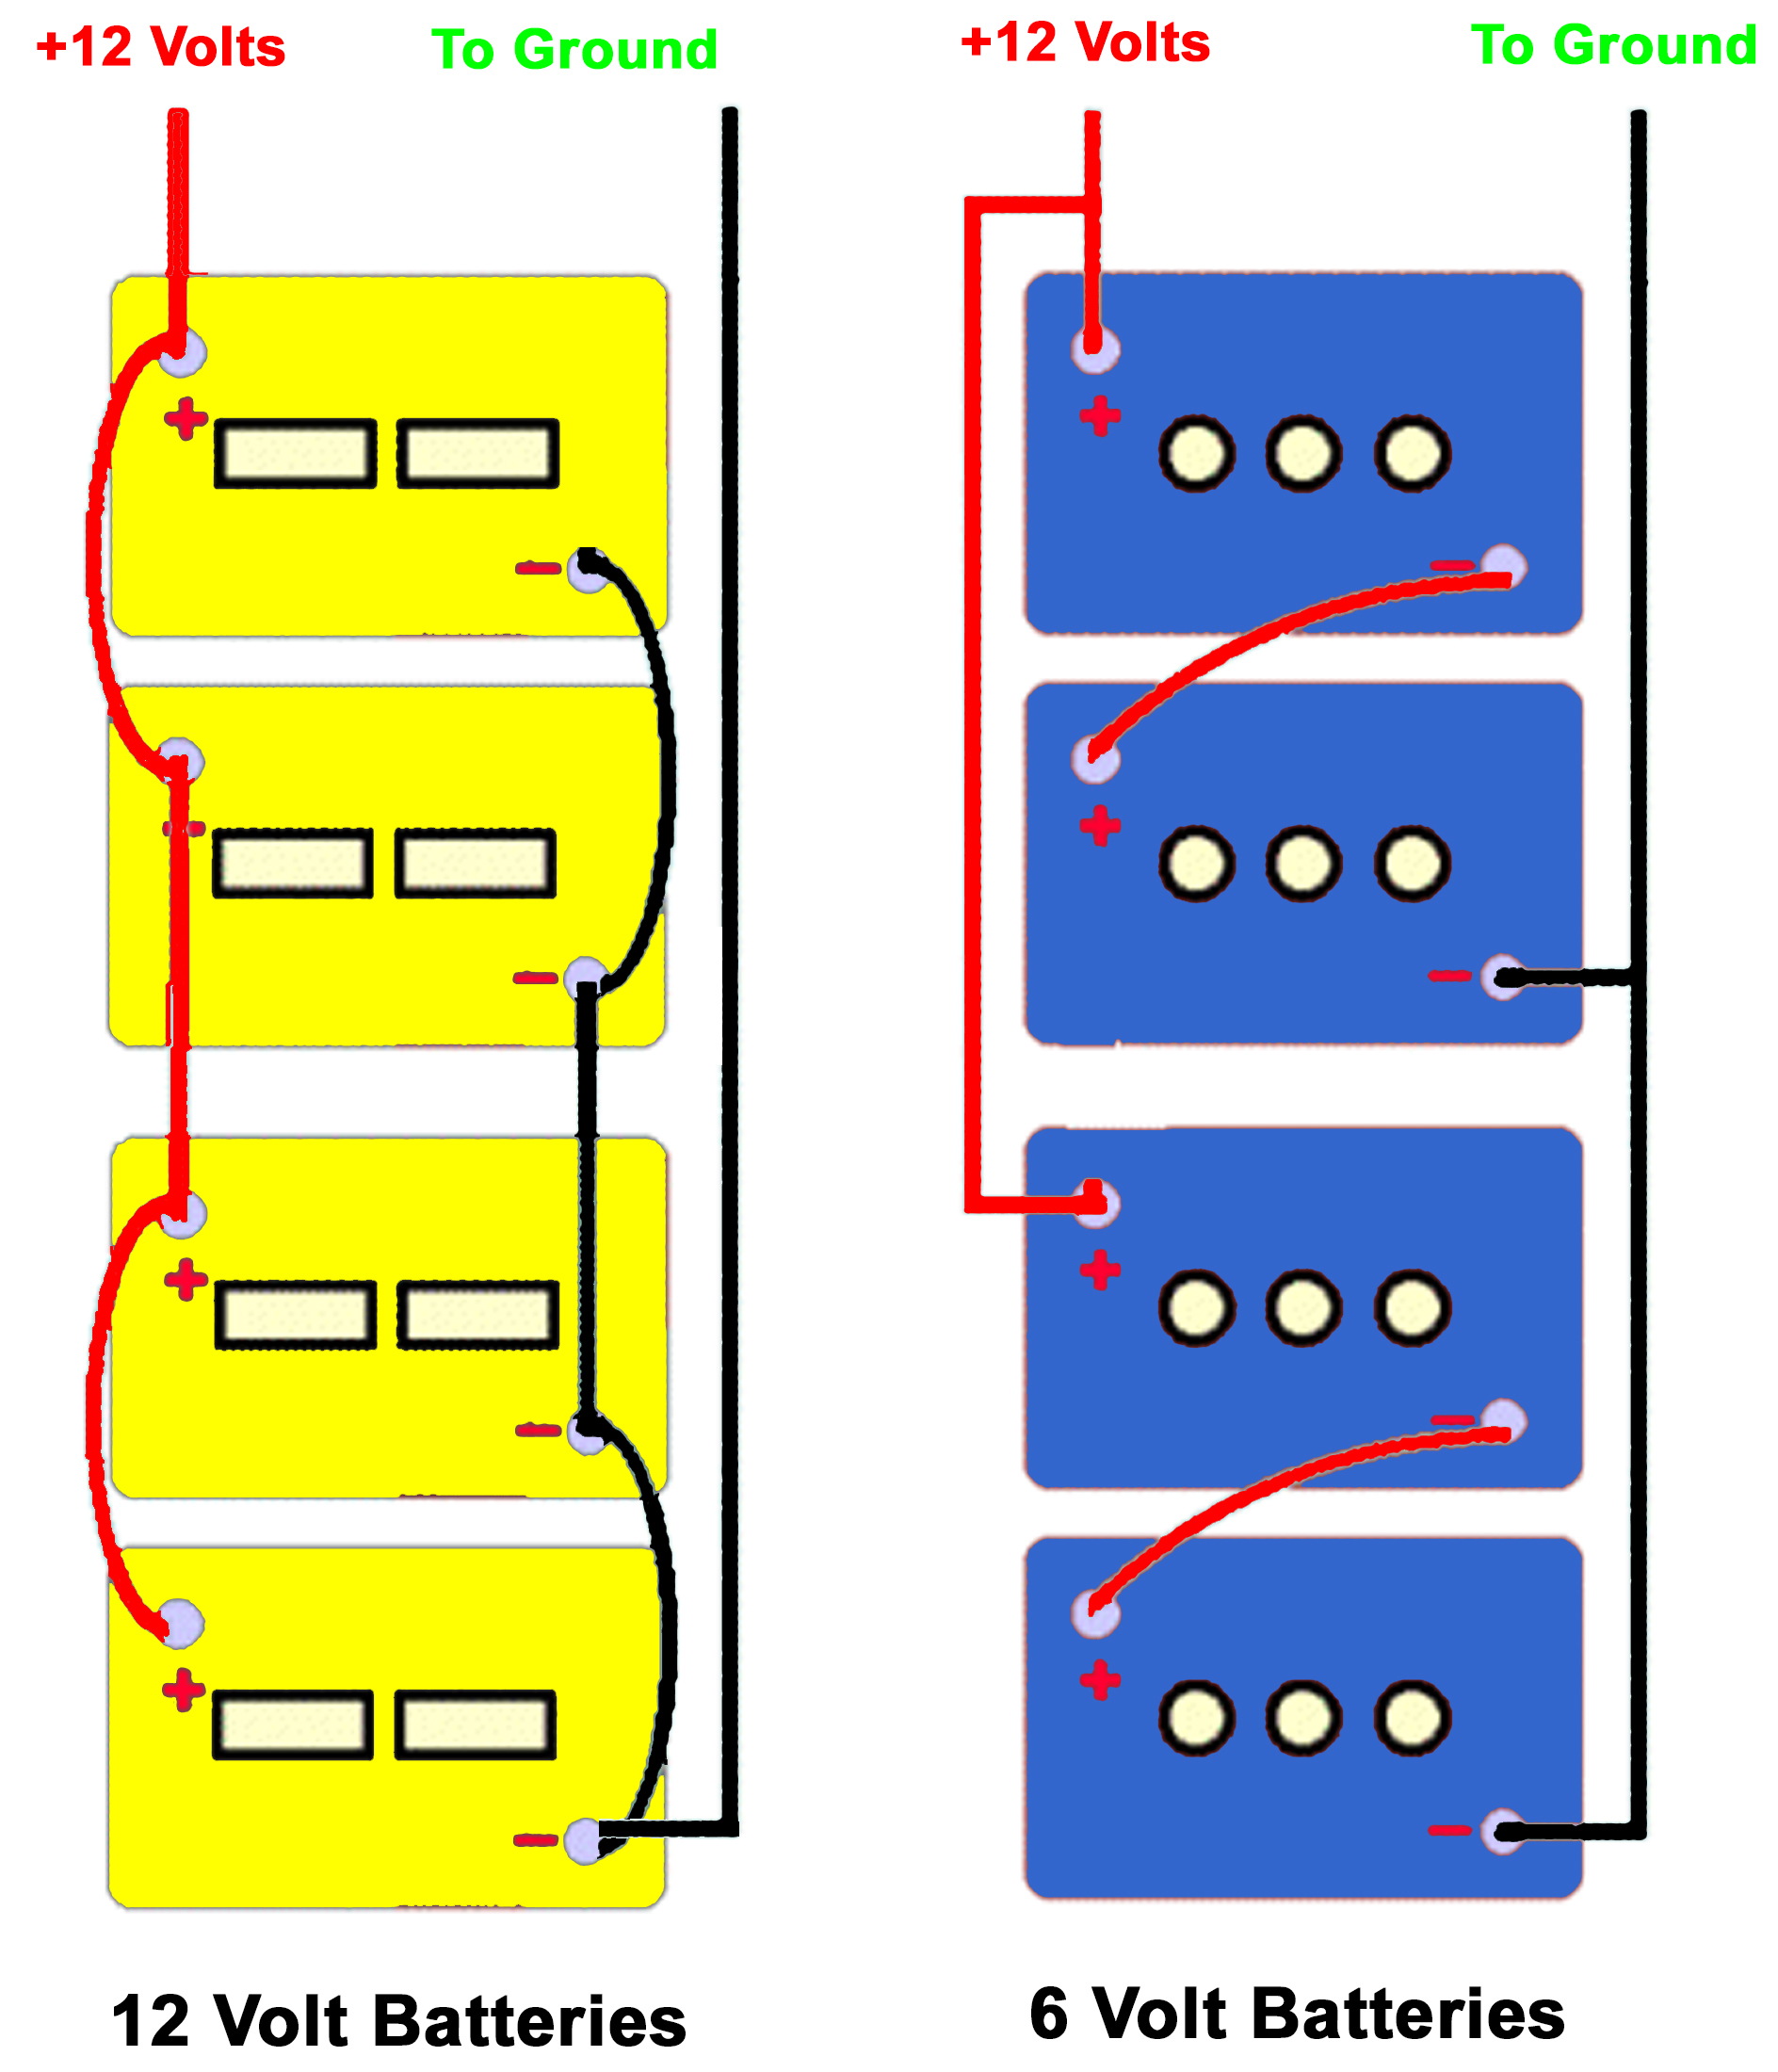
Example of parallel and series-parallel battery bank wiring.
When two batteries are connected in parallel, the amperage doubles while the voltage remains the same. When two batteries are connected in series, the voltage doubles but the amperage remains the same. For a typical bank of four 6 volt deep cycle batteries, two 6 volt batteries will be connected in series to make a pair that outputs 12 volts. The other two batteries are also connected as a pair. Then these two pairs are connected in parallel to double the amperage. In effect, each pair is treated as one large 12 volt battery. This series-parallel arrangement allows for large 12 volt battery banks that are made up of 6 volt deep cycle batteries and can have 6, 8 or even more batteries.
RV battery damage
Flooded batteries do require maintenance. When in use, the electrolyte begins to turn into water while the sulfur attaches to the battery plates. When the batteries are recharged, the sulfate on the plates recombines with the electrolyte but if the charge continues once the battery is fully charged, outgassing will occur as the electrolyte boils. This produces explosive hydrogen gas and acidic vapors that will exit via the vent caps on the batteries. These acidic gasses can corrode the battery terminal connections as well as hold-down bolts or anything else in the battery compartment. For these reasons, it’s important that flooded batteries always be placed in a vented compartment to prevent the buildup of explosive hydrogen gasses and that no electrical components that could create a spark are in the immediate vicinity.
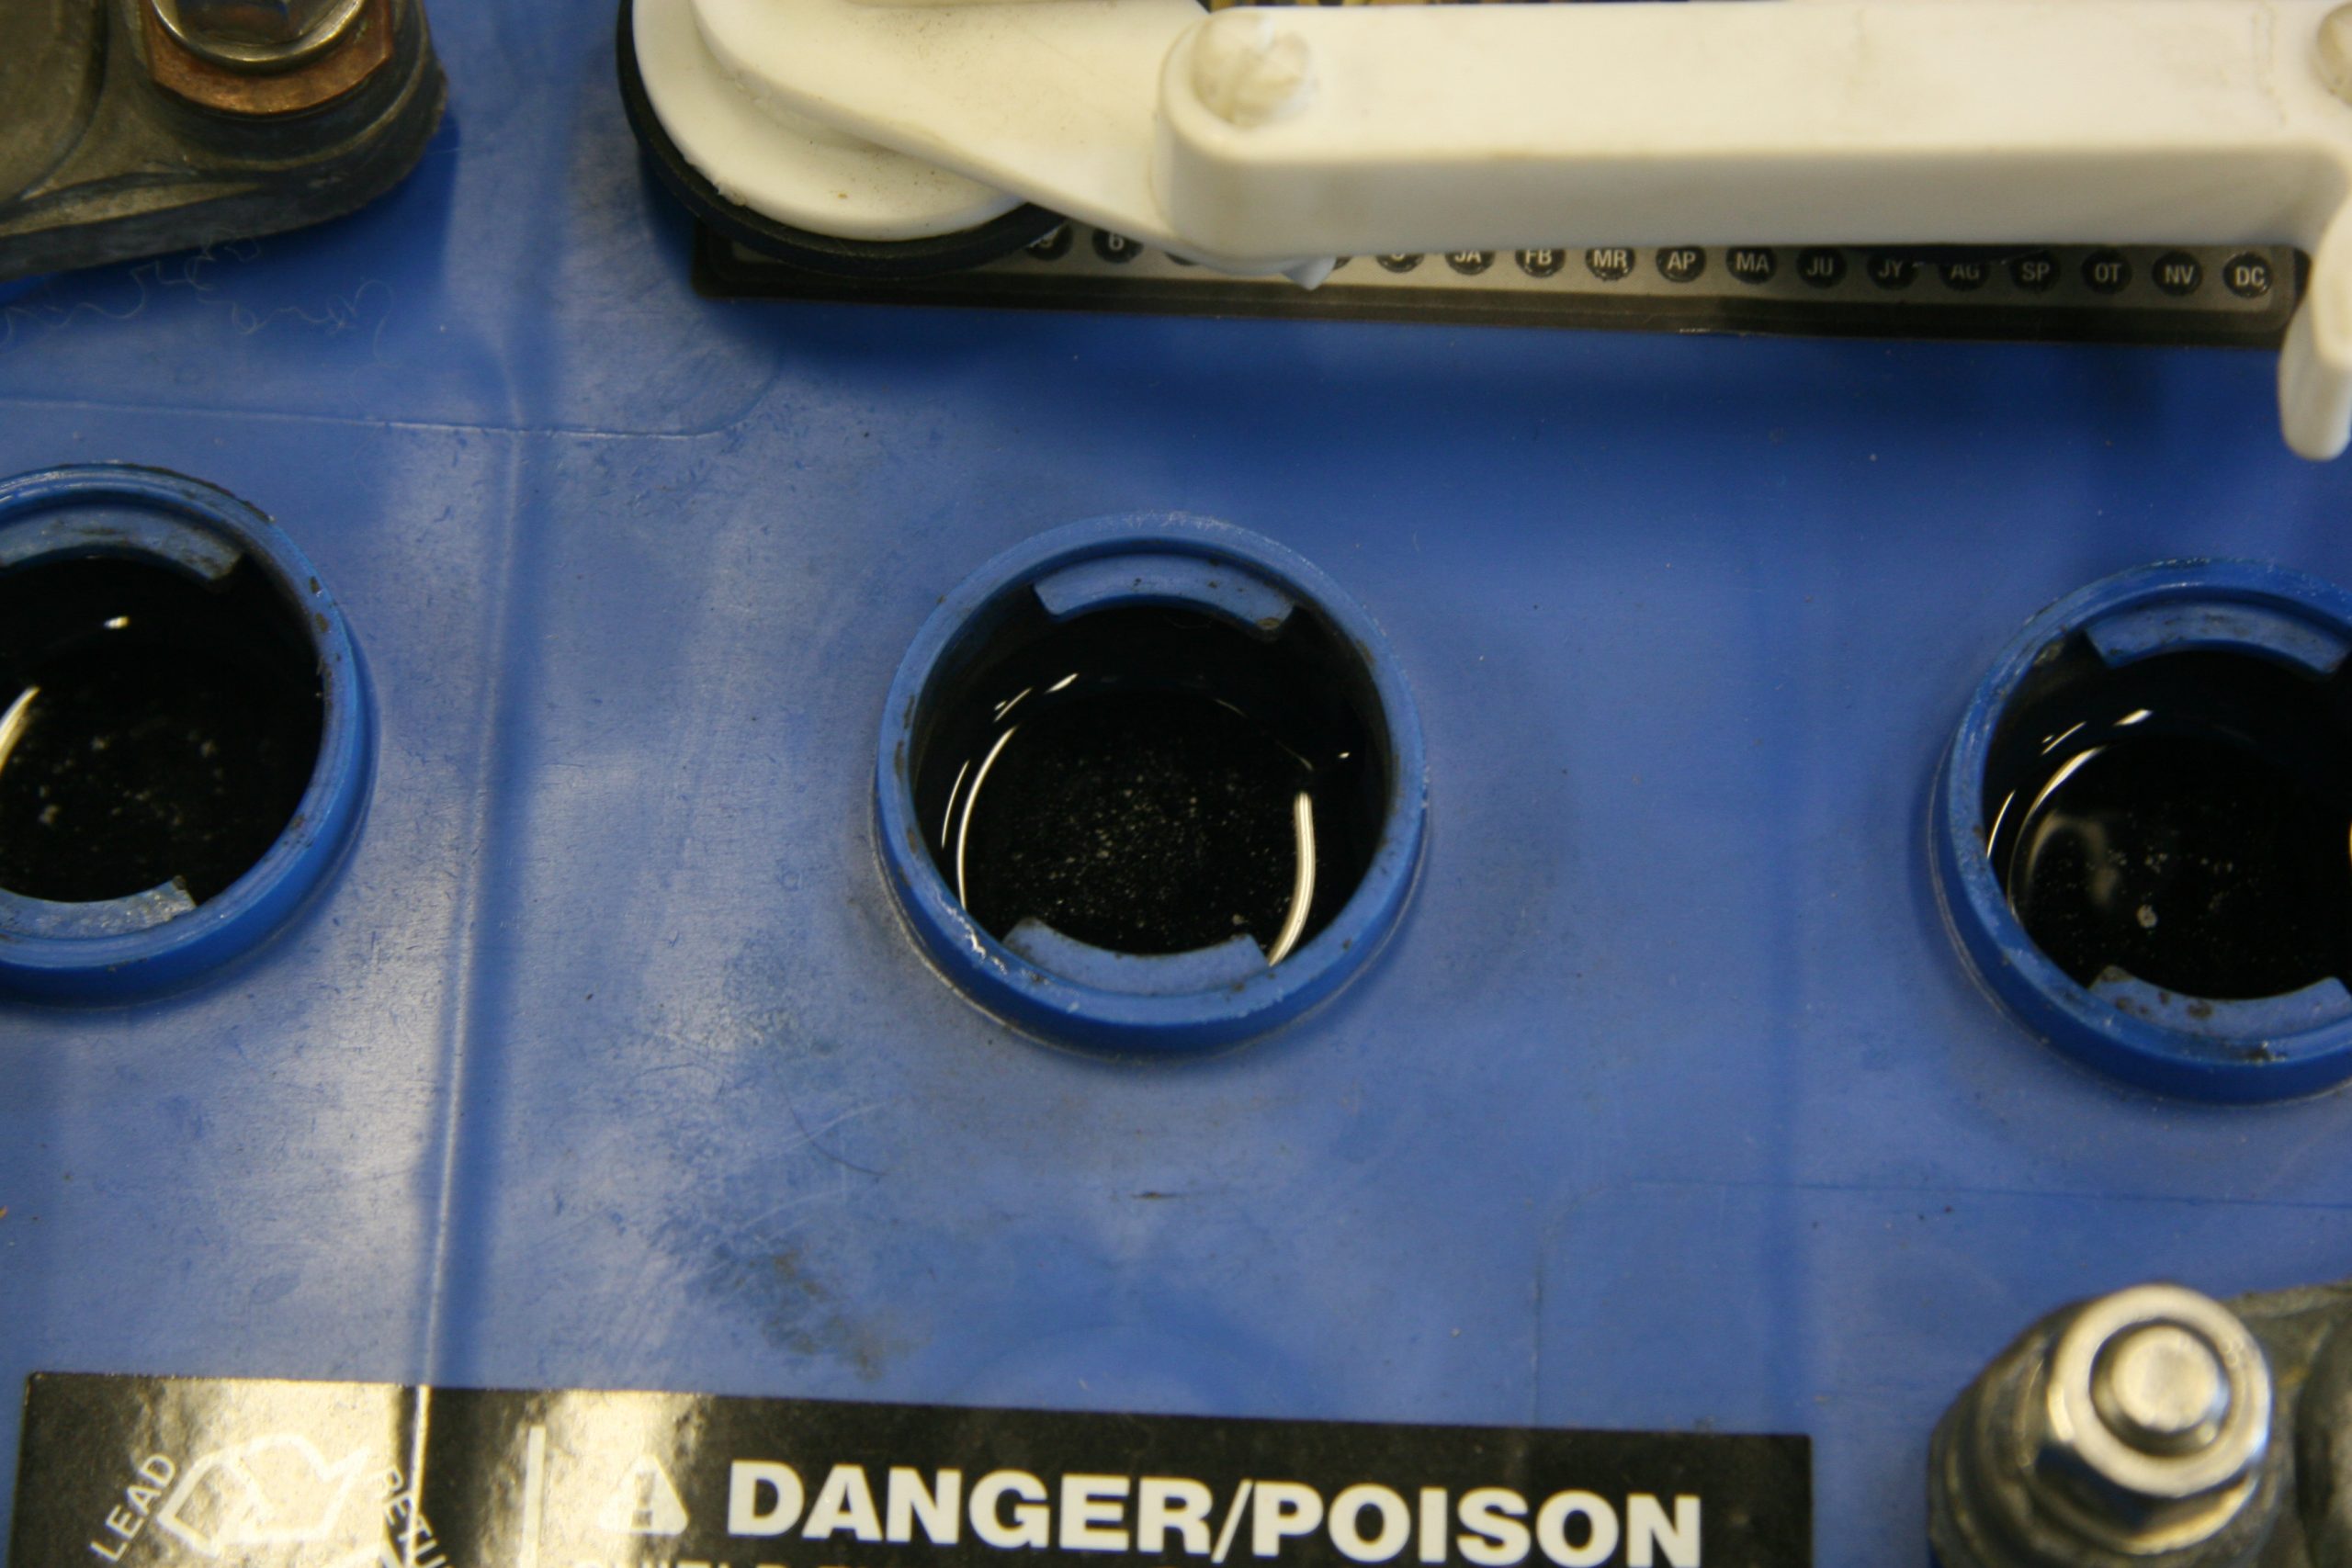
Flooded batteries should be inspected regularly to ensure the water level is up to the ring
When outgassing occurs, the electrolyte level will decrease. At this point it will be necessary to add some water to the battery to top off the electrolyte level. Be sure to use distilled water or else you may be reducing the ability of the battery to conduct electricity as the minerals in the water attach themselves to the battery plates. If the electrolyte level drops beneath the top of the battery plates, your battery’s life will be reduced. Do not add additional electrolyte to the battery. Only add distilled water.
Outgassing occurs whenever the battery receives more voltage than it needs. Battery charging needs are typically handled by converters or inverter/chargers that utilize a 3-stage battery charging system. The initial charge mode is known as the Bulk Charge mode and restores the most power into the battery by producing constant current until it reaches a preset voltage. Once the preset voltage is reached, the charger goes into Absorption Mode and the voltage is held while the current flow gradually tapers. Finally, the charger kicks into Float Mode in order to maintain the charge level without overvolting the battery. If your battery charger is properly calibrated, the odds are good that you will need to add very little, if any, water during normal use. If you find that you are constantly adding water, be sure to have your charger tested by NIRVC’s service department to ensure it is not supplying excessive voltage in the float mode and damaging your batteries.
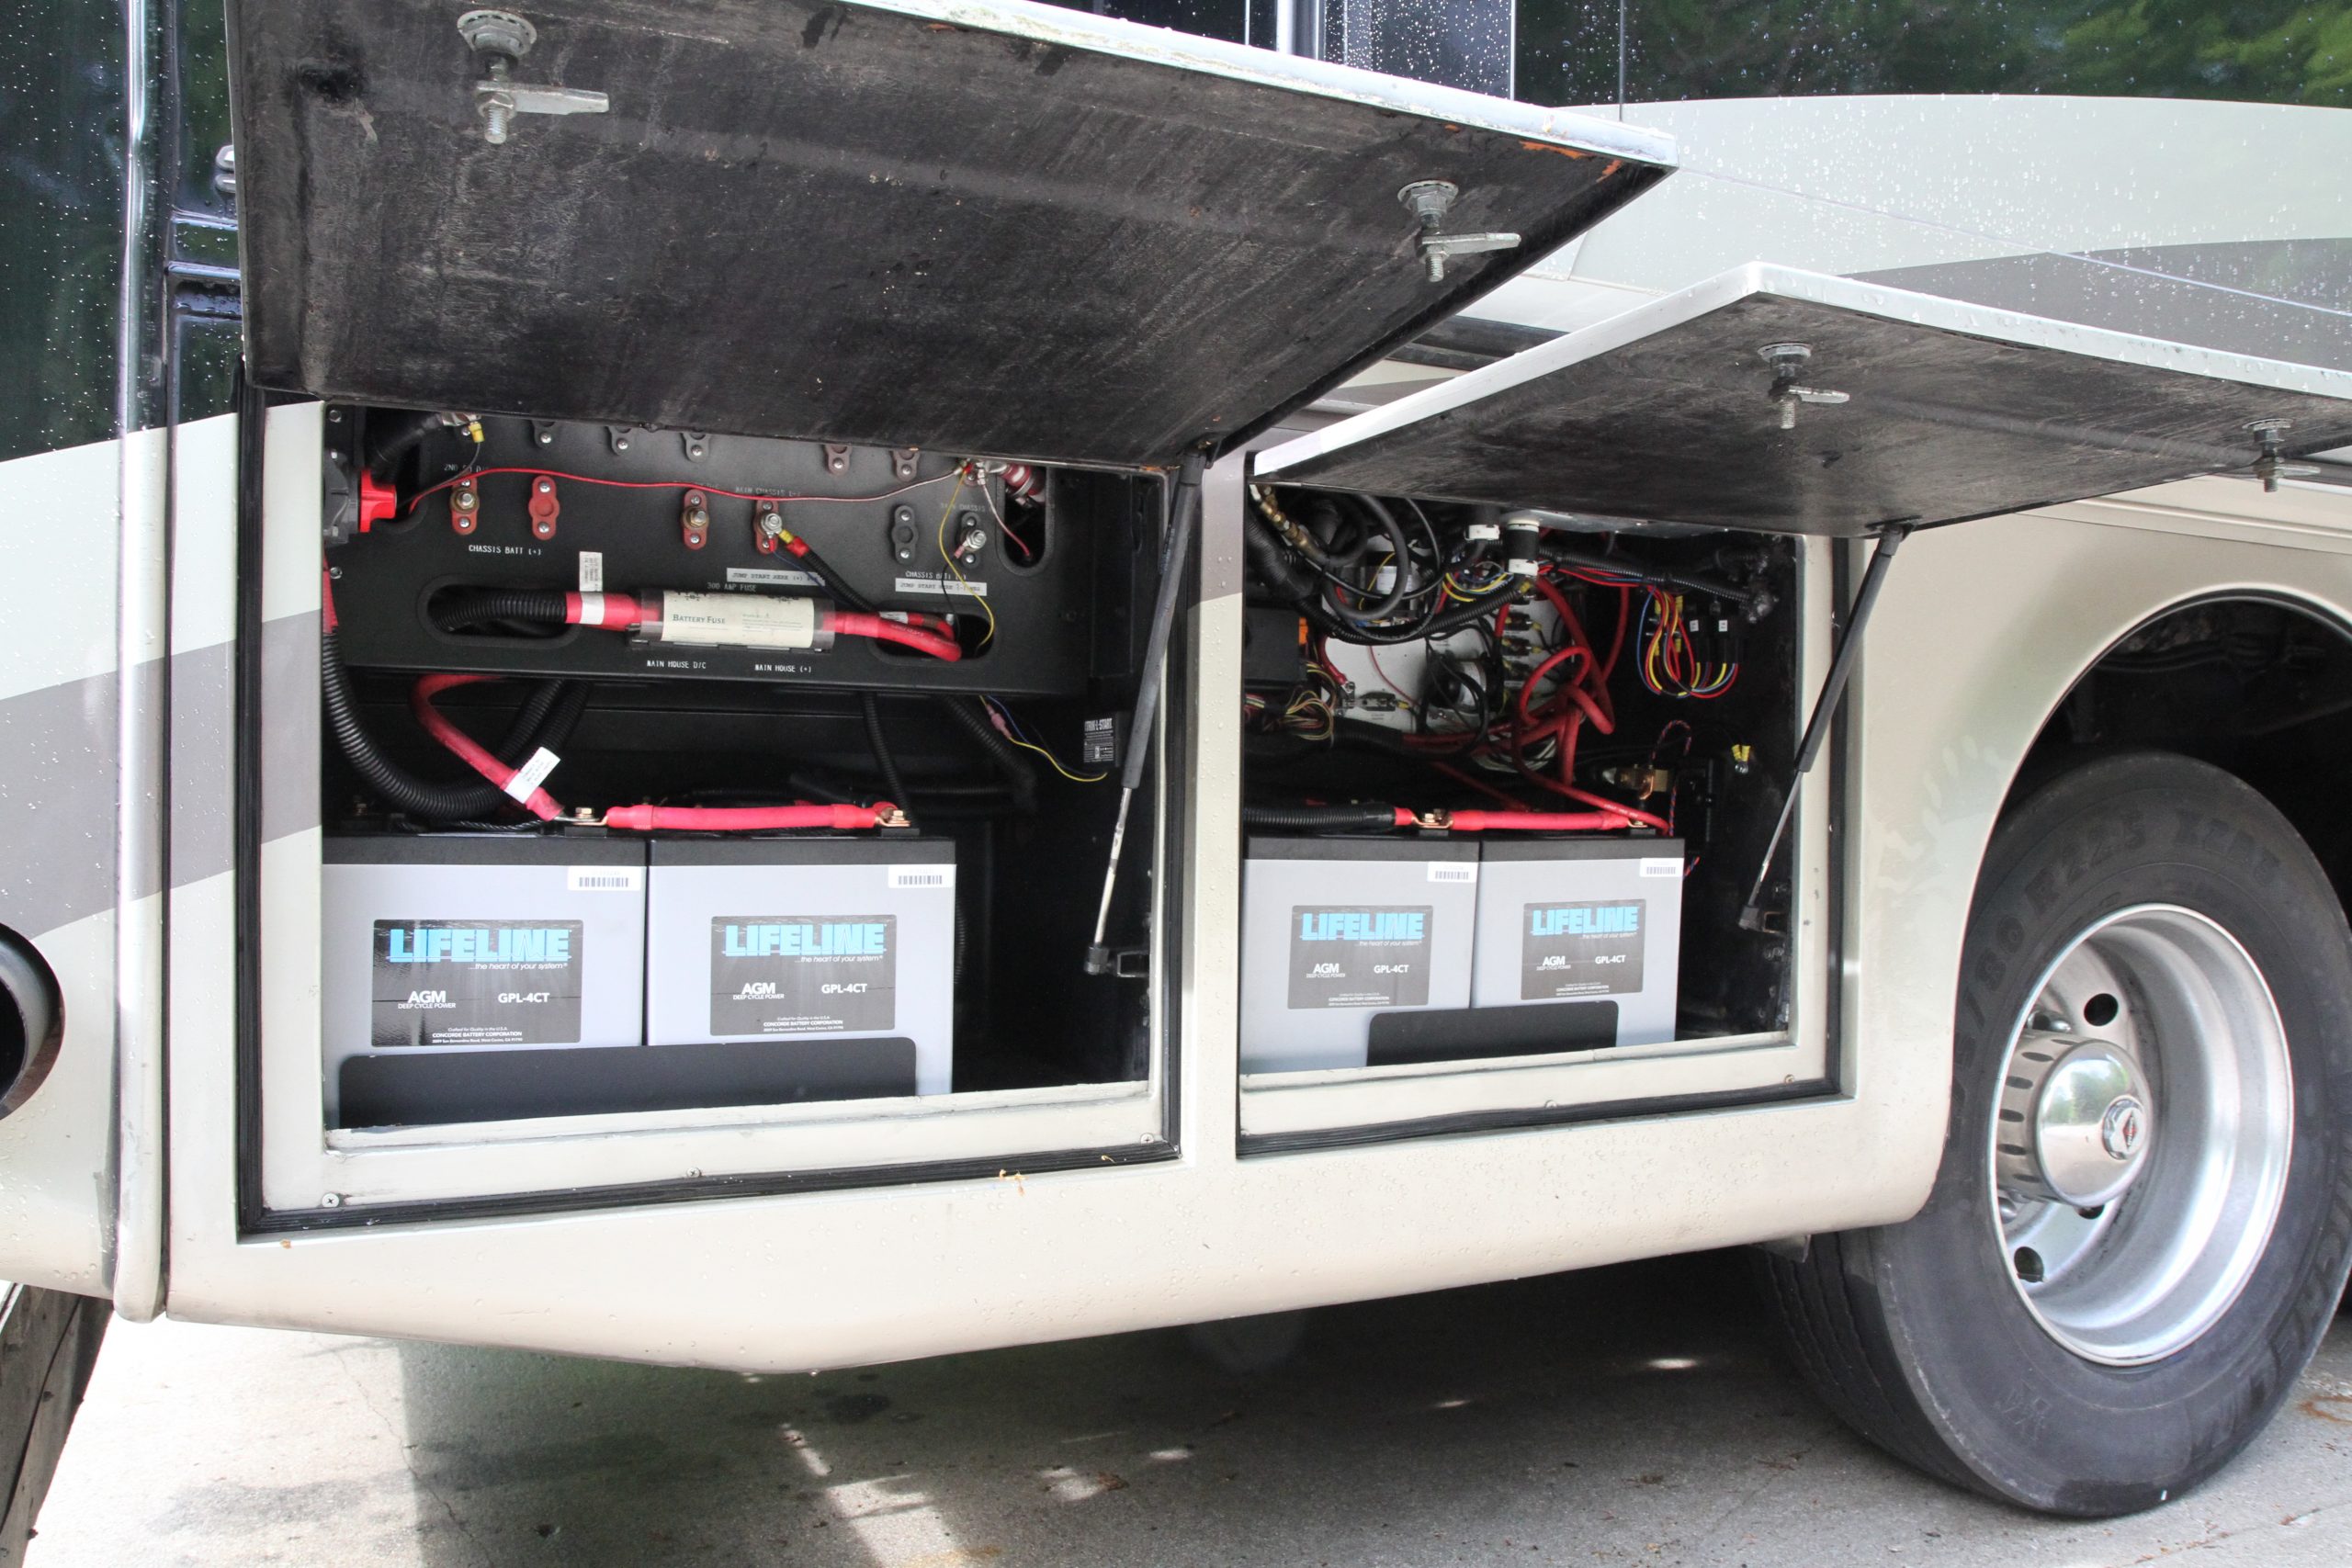
One other option is to upgrade to AGM batteries. AGM stands for “Absorbed Glass Mat.” A typical flooded battery consists of lead battery plates submerged in an electrolyte solution. They outgas hydrogen and corrosive gasses when charged, so you need to check the water level regularly and will have to deal with keeping the battery terminal connections clean from corrosion salts. An AGM battery places its electrolyte in fiberglass mats that surround the battery plates. There is no liquid electrolyte in the battery and the battery chambers are not truly vented, although they are valve-regulated to allow for thermal expansion. Because of this, there is no negligible outgassing to be concerned with. You’ll never have to check or add water and corroded battery terminals caused by the acidic outgas vapors are a thing of the past. AGM batteries also have less internal resistance, so they recharge faster than flooded batteries. You can also run an AGM battery longer because the voltage falloff curve is flatter than on a flooded battery. The end result is that you can get more runtime hours out of an AGM battery than an equally rated flooded battery because you can go a bit longer before you reach that 11.8 volt level. Suppliers such as Concorde Lifeline are the leaders in this field. The only real drawback to AGM batteries is that they do cost more.
Image of a voltmeter
When flooded batteries just aren’t doing the job any more, it’s time to perform some tests on your system. The first test is the voltmeter test. If your batteries are fully charged, you should be able to see 12.6 volts at each battery. But testing voltage will not tell you if the battery is any good. It will only tell you if it is charged up and has no bearing on the ability of the battery to pass the rated number of amps upon demand. However, your batteries do need to be fully charged when testing, so this is the first step. Once you have the batteries fully charged, disconnect any loads from them and stop the charger. A battery that has just been charged will have a surface voltage of 13.2 volts or more. This is a false voltage so let the batteries rest for a while to allow the surface voltage to dissipate. The voltage should stabilize around 12.6 volts. If you cannot achieve 12.6 volts, then it will be necessary to proceed to the next step and test each battery.
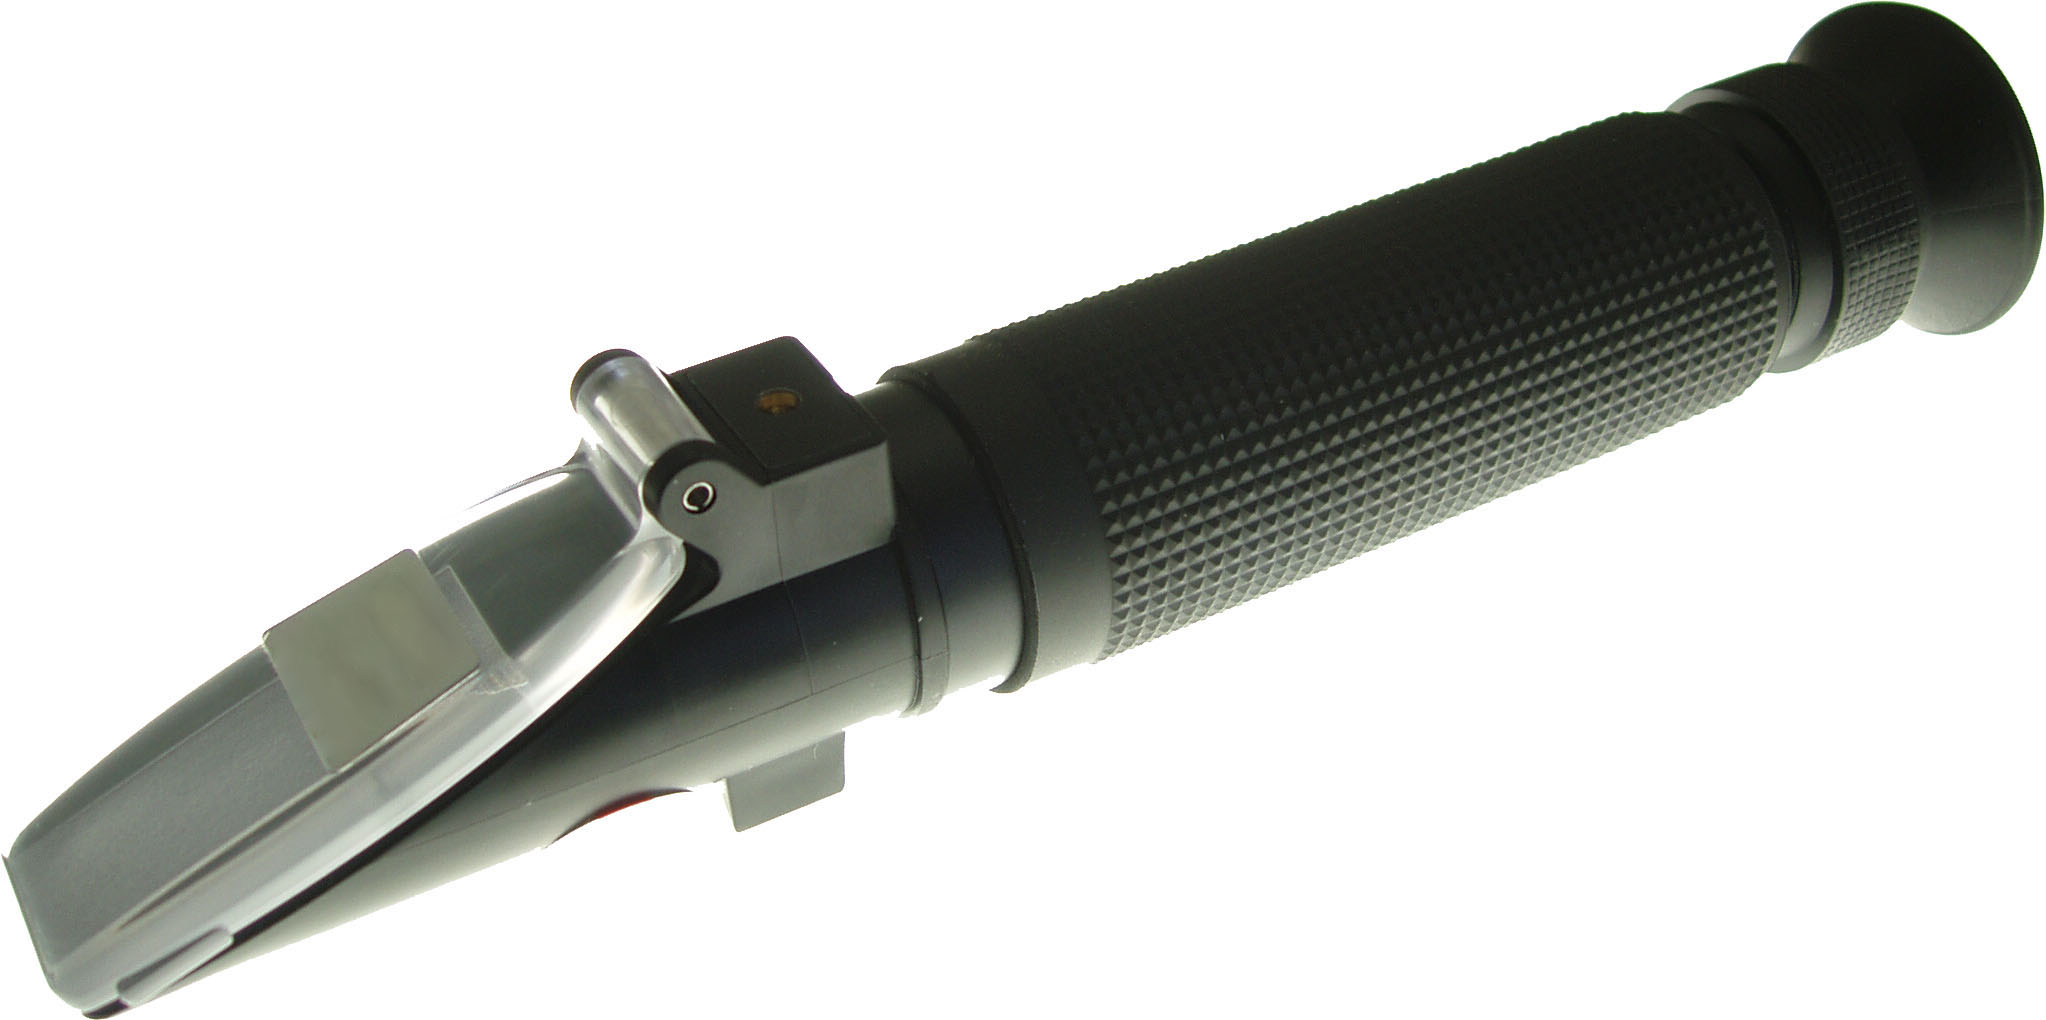
A refractometer will show you the exact specific gravity of each cell
The next step is to see what each battery cell looks like. When battery electrolyte is fully charged, its specific gravity increases. When it’s discharged, the specific gravity lowers because it’s basically water instead of acid. You can use a hydrometer to test the specific gravity but hydrometers are pretty much old school. Refractometers are much more accurate and do not require temperature compensation. Plus, a refractometer can be used to test antifreeze as well as battery electrolyte so it’s a handy tool for any motorhome owner to have.
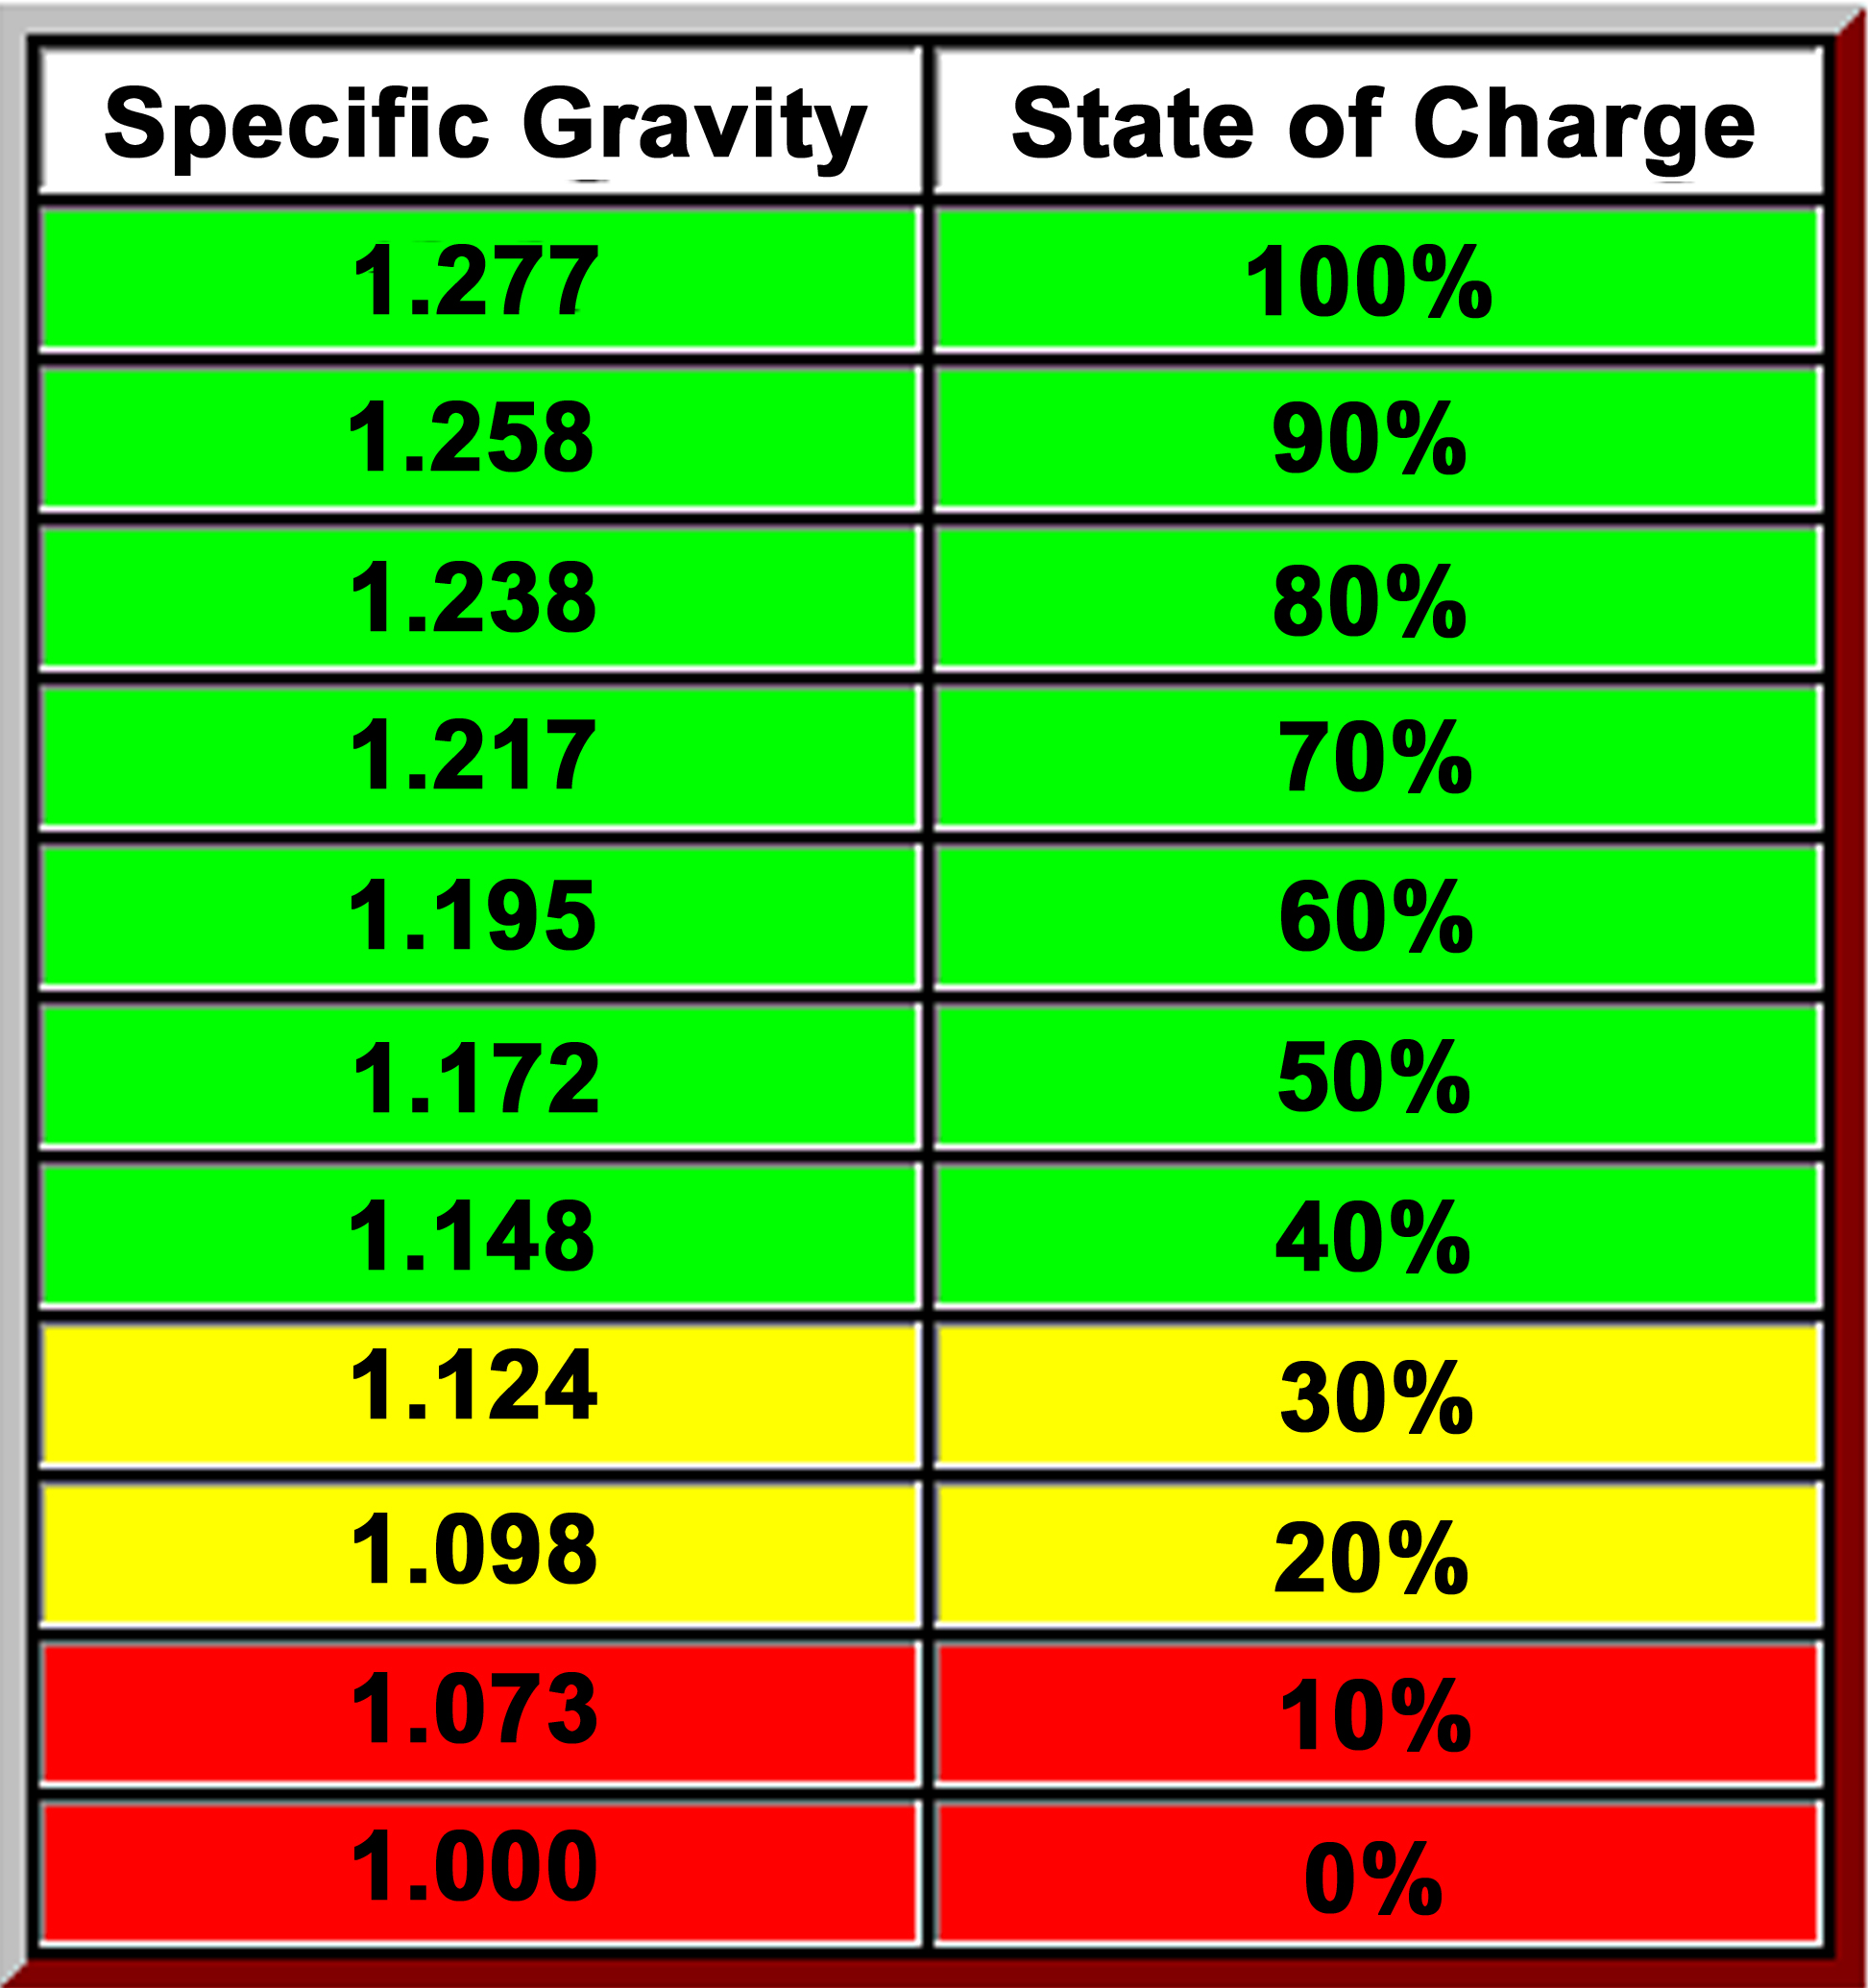
Every cell in a battery needs to be up to snuff, or else the battery will not work – very much like a weak or broken link in a tow chain. Remove each battery cap and take a small sample of electrolyte with your hydrometer or refractometer. Refer to the chart below to see the state of that cell. If the battery is perfectly charged, the specific gravity should be around 1.277. The main thing to check for is that all of the cells are fairly even. If you have one dead cell, the battery won’t perform because it’ll be like a tow chain with a broken link. Similarly, if you have two 6 volt batteries in series, neither battery will be able to pass current with that one bad cell in the chain.
The specific gravity versus state of charge graph
Once you have determined that the batteries are fully charged and that each cell is within tolerance, the next step is to perform a load test. Load tests are done by your service technician with a unit such as a carbon pile tester. A carbon pile tester is a dead load that can be varied by turning a knob. An ammeter and voltmeter are supplied to monitor battery performance. A typical test consists of adjusting the control until the ammeter reads three times the rated amp-hrs of the battery. Hold this for a few seconds and monitor the voltmeter. If the battery voltage drops into the red zone, your battery is no longer capable of performing at its rated capacity.
A carbon pile tester is used to show the ability of a battery to maintain a current draw and is a true test of a battery’s ability to perform
At this point you may need to replace your batteries, but there is one last trick you can try to recover them. Battery plates become sulfated over time and the sulfur no longer recombines with the electrolyte when recharged. You can try to equalize your batteries to see if you can restore some life back into them, a process that involves applying a higher voltage current to the batteries to boil the electrolyte. Hopefully this cooks off any sulfate that has attached itself to the battery plates. Not every battery system can be equalized and damage can occur to your batteries and electrical system if not done properly, so be sure to check with your service technician to see if this is a viable option for your coach.
Lastly, the recent trend toward lithium-ion batteries has taken battery technology to a whole new level. Lithium-ion batteries cost more initially but when calculated over a long term, they can actually cost less. These batteries will last for 3,000 cycles or 10-15 years, which really does reduce the cost per year. Lithium-ion batteries also are able to draw 100% of the rated amp-hrs, while flooded and AGM lead-acid batteries shouldn’t go below 50%. This means lithium-ion batteries only need to be rated at one-half the amp-hrs of a lead-acid battery to deliver the same performance, which will save you space. They are also lighter in weight (which will give you a boost to your cargo carrying capacity) and accept a charge 5-times faster than lead-acid batteries.
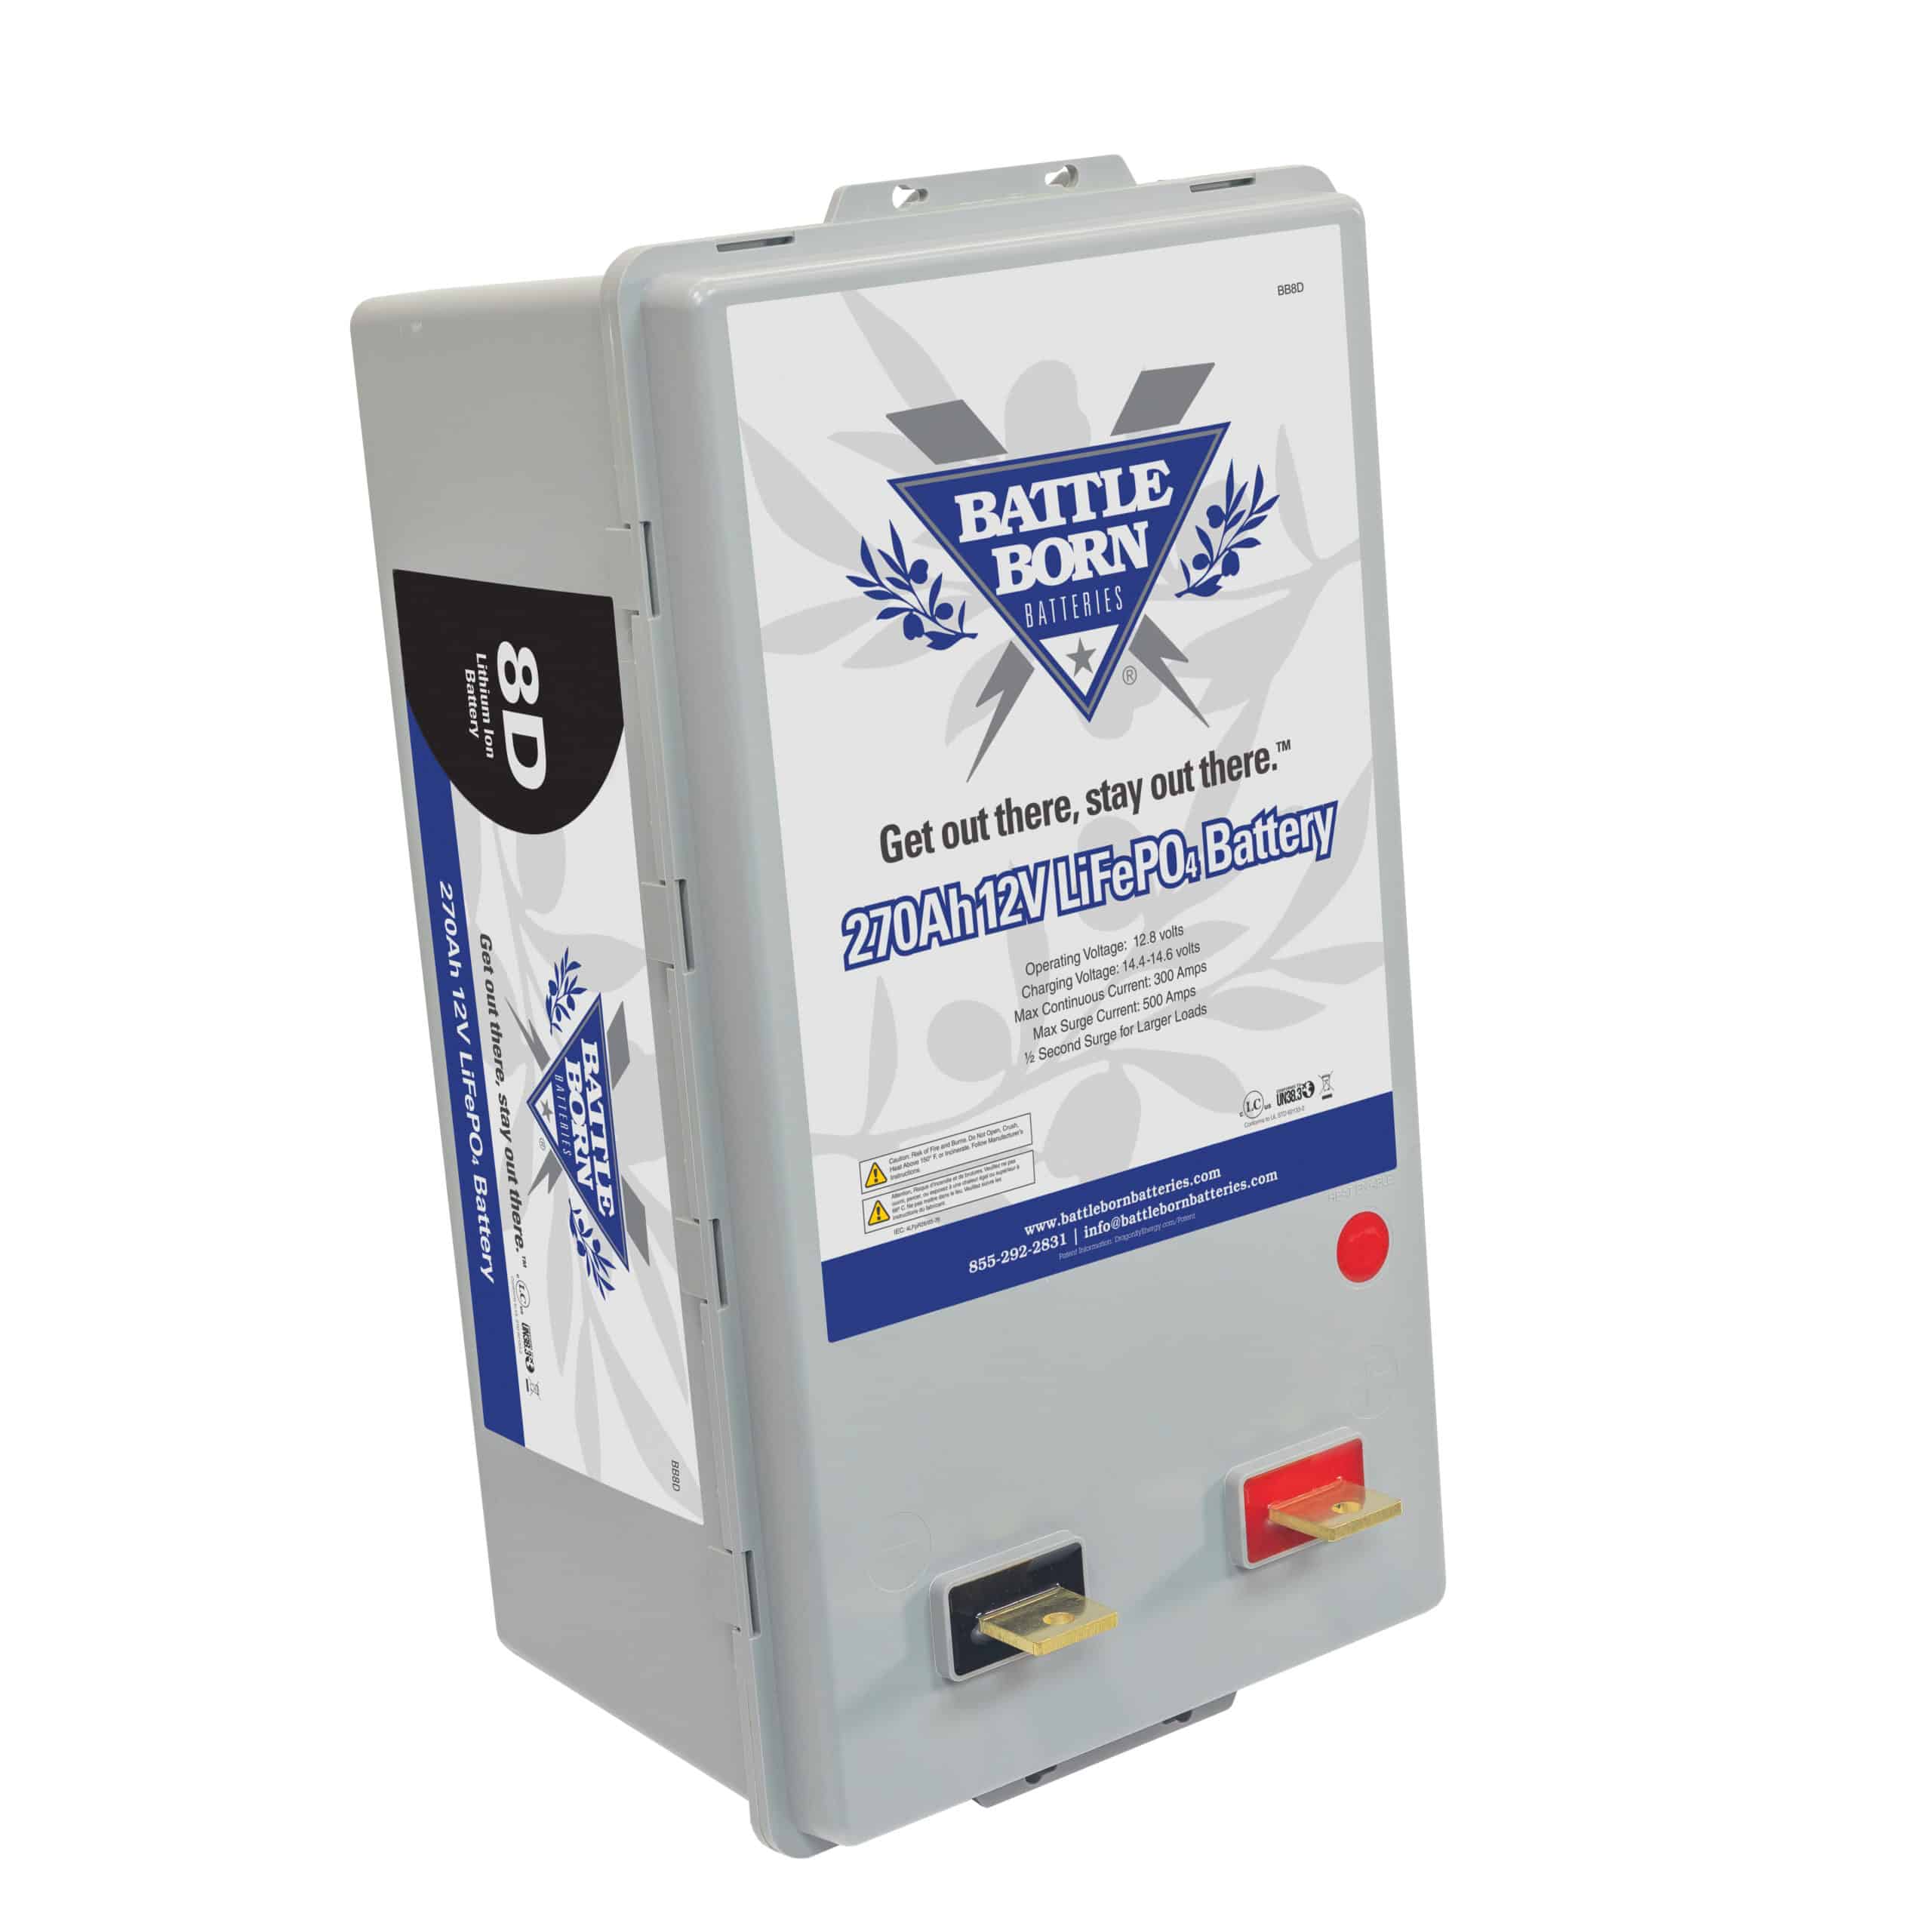
This is a large 270 AH size 8D lithium-ion battery with built-in Battery Management System (BMS).
Lithium-ion batteries do have a few caveats to consider, however. They don’t like to be charged with excessive voltage, which will harm them. Inverter-chargers normally don’t cause any issues but the vehicle’s alternator can put out excessive voltage that can damage these batteries when driving. This can be rectified by using an intelligent Battery Management System (BMS) that only connects the chassis battery bank and alternator to the coach’s lithium-ion battery bank when the voltage is low enough. The BMS acts as a voltage regulator to prevent battery damage from an alternator. In some cases, as with Battle Born Batteries, a BMS is built right in. Lithium-ion batteries should not be allowed to freeze. Battery heaters are a required accessory although some batteries have integral heaters built right inside. These 12 volt heaters will need to be powered when in cold weather.
Lithium-ion batteries can be an expensive upgrade but if you plan on keeping the coach long enough, it’ll be a good investment. Plus, the ability to use the total capacity of the battery will give you more amp-hrs, allowing greater times between recharge cycles. That, and the reduced weight, are great benefits. But it’s not a simple swap. You’ll need to make sure that you have a battery management system, a charger that is capable of the right settings for lithium-ion batteries, and a way to keep them from freezing. Once again, your NIRVC technician can advise you if your coach is ready for the lithium-ion upgrade.
Regardless of which battery style you use, you should be able to get the maximum lifetime out of your batteries if you take proper care of them. With proper maintenance and use, you’ll enjoy many hours of trouble-free use.
For a better understanding of your RV’s electrical systems, check out this great three-part blog from Mark!

Mark Quasius is the founder of RVtechMag.com, the past Midwest editor of RV Magazine, writes for numerous RV-related publications and a regular contributor to FMCA’s Family RVing Magazine. Mark and his wife Leann travel in their 2016 Entegra Cornerstone.

